- Home QZ
- Hanging and Fixing
- Hanging peel and stick mirror tiles so they sit flat
Hanging peel and stick mirror tiles so they sit flat
Learn how to hang peel and stick mirror tiles on your wall so they sit perfectly flat, align straight and stay put and come down with care.
Guide by Milo Nussbaum
8 min of reading
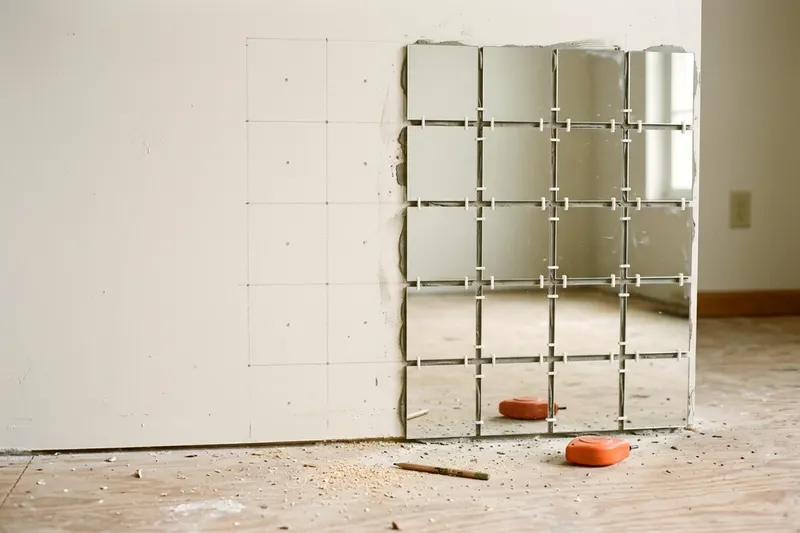
Peel and stick mirror tiles require a completely flat surface and a square layout to look good. Check your wall for bumps, draw a level grid and press the tiles firmly into place. Following these steps helps your reflection stay clear and straight.
Pick a flat and smooth wall
Mirrors show every bump. Sticking a mirror tile over old paint lumps bows the glass. A bowed mirror creates a distorted reflection. Run a straight piece of wood across the wall.
Look closely for gaps between the wood and the drywall. Circle any high spots lightly with a pencil. Sand those lumps down with medium-grit sandpaper. Keep sanding until they sit flush with the wall.
Look for low spots and dents. Fill these dips with spackle using a plastic putty knife. Scrape the spackle flat and let it dry completely. Sand the dried spackle smooth.
Texture ruins the grip of adhesives. Orange peel or knockdown drywall texture prevents the glue from making full contact. The tiles may fall off a heavily textured wall. Sand the wall smooth if you find texture.
A wall with wallpaper or heavy texture needs fixing first, by removing old wallpaper and skim coating the drywall underneath. The adhesive needs a sealed surface to grip properly. Bare drywall may not hold the glue well.
Stick your tiles only to a wall that has a solid coat of cured paint, and check the box for where the tiles can and cannot go. Flat or eggshell paint finishes often work best. Glossy paint can be too slick for the glue. Scuff glossy paint lightly with fine-grit sandpaper.
Scuffing helps the adhesive bite into the surface. Wipe away all the sanding dust with a damp rag. Let the wall dry thoroughly before starting the layout.
Draw a level grid on the wall
Guessing where the initial tile goes causes problems later. Rooms are rarely completely square. Baseboards and ceilings usually slope slightly over a long span. Following a sloped baseboard tilts your whole mirror grid.
Find the exact center of your wall space. Measure the total width and find the midpoint. Measure the total height and find the midpoint. Mark the intersection of these measurements with a pencil dot.
Place a long bubble level against the dot. Adjust the level until the bubble rests exactly between the center lines. Draw a light pencil line across the top of the level. This creates your horizontal guide.
Turn the level vertically. Line its straight edge up with your center dot. Adjust the tool until the bubble is exactly centered again. Draw a vertical line down the wall.
Building your grid out from this center cross keeps everything straight. Lay a row of your mirror tiles flat on the floor. Measure the exact width of a single tile.
Mark that distance repeatedly along your horizontal pencil line. Do the exact same thing for your vertical line using the tile height. Use your level to connect all these pencil marks.
Draw the entire grid directly on the wall. Place the edge of each mirror tile against these lines. This layout keeps the whole arrangement completely straight.
Planning from the center also prevents awkward cuts. Starting at a corner often leaves a tiny sliver of mirror on the opposite side. A center start ensures any cut pieces on the outer edges are wide and balanced.
Clean the drywall and the tiles
Dust ruins the bond of any adhesive. Dust between the glue and the wall makes the tile stick to dirt instead of paint. The tile will slowly peel away and drop. Surface preparation matters for any peel and stick project.
Mix a few drops of mild liquid dish soap into a bucket of warm water. Dip a clean sponge into the soapy water. Wring the sponge out completely. Keep the sponge barely damp, not dripping wet.
Wipe down the entire grid area on the wall. Pay special attention to the corners and baseboards. Dust loves to collect in those spots. Rinse the sponge in clean water.
Wring the sponge out again and wipe the wall another time. This removes any leftover soap residue. Leave the wall alone until it feels completely dry. Wet walls repel adhesive.
Take your new tiles out of the box carefully. Inspect the backs of each piece. Cardboard dust from the packaging often settles onto the adhesive backing during transit.
Wipe a dusty backing gently with a dry microfiber cloth. Avoid using a wet cloth on the tiles before removing the paper. Wash your hands thoroughly with soap and water. Oils from your skin can weaken the glue.
Stick the tiles to the wall
Start your installation right at the center cross. Take the initial tile and peel back a small corner of the protective paper. Leave the rest of the paper backing in place for now.
Removing all the paper makes the tile too sticky to handle easily. Accidental sticking becomes a major risk. Line up the bottom and side edges exactly with your pencil lines.
Press the exposed sticky corner firmly against the drywall. Check your alignment again. Pull the corner up gently and reposition the glass right away if it sits crooked.
Reach behind the glass. Slowly pull the rest of the backing paper downward and away. Press the tile flat against the wall as the paper comes off.
Use a soft microfiber cloth to smooth the tile. Push firmly from the center outward. Pushing from the center forces any trapped air out to the edges.
Apply firm pressure across the entire surface of the glass. The cloth prevents fingerprints. It also spreads your pushing force evenly across the fragile mirror.
Move to the next tile in the center block. Line up its edge directly against the installed tile. Keep the joint extremely tight. A visible gap between mirror tiles breaks the reflection.
Match the bottom edge with your horizontal pencil line. Stick the corner, pull the backing and press the glass flat. Repeat this process for every single tile in your grid.
Work your way outward from the center cross. Check the alignment against the pencil lines constantly. A tiny mistake in the middle grows into a visible gap at the outer edge.
Cut the mirror tiles safely
Put on heavy leather work gloves and protective safety glasses. Do this before making any cuts. Glass shards cause serious injury if they splinter.
Keeping safety glasses close is a smart habit for any basic home repair job. Cutting a tile becomes necessary to fit around an electrical outlet, but check the maker's instructions first because some mirror tiles should not be cut, and ask a glass supplier to cut them if you are unsure. Measure the remaining space on the wall carefully.
Transfer that exact measurement to the front glass of a mirror tile. Use a felt-tip pen for the mark. Lay the tile flat on a sturdy workbench. Place a thick metal ruler directly along your marked line.
Hold a glass cutter against the edge of the ruler. Press the cutting wheel down firmly on the glass. Pull the tool toward you in a smooth motion.
A distinct scratching sound should follow the cutting wheel. Score the line only a single time. Going over the line again can ruin the cut.
Slide the tile to the edge of the workbench. Align the scored line exactly with the square edge of the table. Hold the main body of the tile flat against the table surface.
Grasp the overhanging piece firmly with your gloved hand. Snap the piece downward with a quick motion. The glass should break along the scored line.
The freshly cut edge will be razor sharp. Run a piece of fine-grit sandpaper very lightly along the cut edge. This knocks down the sharpest fragments. It makes the tile a little safer to handle, but keep your gloves on.
Test the fit on the wall before peeling away the backing paper. Verify that the cut tile slides into the remaining space easily.
Remove the tiles carefully
Peel-and-stick adhesive bonds strongly to painted drywall. Grabbing a corner and pulling hard can tear the drywall paper off. Soften the glue behind the glass before pulling.
Plug in a standard hair dryer. Turn it to a medium heat setting. Hold the dryer close to the face of a corner mirror tile.
Move the hot air back and forth over the glass. The glass transfers heat directly to the adhesive behind it. Heat the tile for several minutes. Stop when the surface feels warm to the touch.
Cut a long piece of thick dental floss. Wrap the ends securely around your index fingers. Slip the string directly behind the top edge of the hot mirror tile.
Pull the string back and forth in a steady sawing motion. Pull downward toward the floor while sawing. The string slices right through the heat-softened adhesive.
Keep a flat hand against the glass, and wear your gloves and safety glasses again. This stops the tile from dropping and shattering on the floor. Work the string all the way to the bottom edge.
Pull the loose tile away from the wall. Wrap the tile before you throw it away. A thick residue stays behind on the paint.
Do not scrape the residue with a metal putty knife. A metal blade can gouge the soft drywall underneath. Test a liquid citrus adhesive remover on a hidden spot of paint first, then apply it to a clean rag.
Rub the remover into the leftover glue spots. Let the liquid sit for a short time to break down the bond. Wipe the wall clean with a damp sponge and let the spot dry.
Line up your next job
-
DIY wainscoting a beginner can put up in a weekend
Building DIY wainscoting adds character to a plain room in a single weekend when you follow these simple steps to measure, cut and paint.
-
How to regrout tile when the old grout cracks
Learn how to regrout tile by cutting out cracked grout, cleaning the joints and packing in fresh material for a clean finish that lasts.
-
5 laminate floor problems you can fix yourself
You can handle common issues with this straightforward approach to laminate floor repair. Learn how to fix gapping joints, squeaks, and chipped planks.