- Home QZ
- Hanging and Fixing
- DIY wainscoting a beginner can put up in a weekend
DIY wainscoting a beginner can put up in a weekend
Building DIY wainscoting adds character to a plain room in a single weekend when you follow these simple steps to measure, cut and paint.
Guide by Milo Nussbaum
7 min of reading
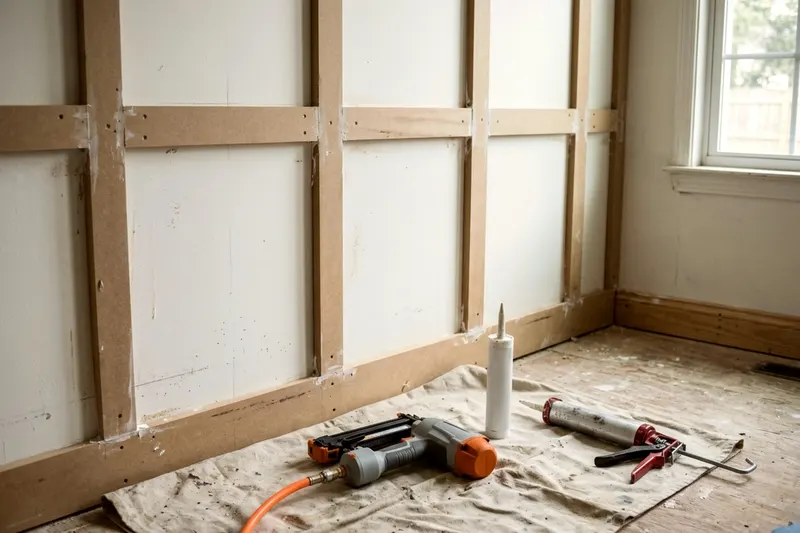
Putting up DIY wainscoting turns a plain wall into a finished one in a single weekend. You will measure the layout, cut boards to length, and nail them flat against the wall. A coat of paint ties the new trim together.
Pick a simple style and set the height
Board and batten is the easiest trim style to start with. You nail flat vertical boards to the wall and cap them with one horizontal rail. The plain drywall stays exposed between the wood pieces. You paint the whole lower wall one color to tie it together.
A basic DIY wainscoting kit offers pre-cut panels for fast assembly. Buying separate strips of medium density fiberboard or pine is often cheaper. Use standard narrow boards to save on cutting time.
Look at your existing baseboard. A baseboard with a flat top edge lets you rest vertical boards straight on top, while a curved decorative lip requires extra work. You must cut the bottom of your vertical boards at an angle to fit over the curve. Many beginners prefer to pry the old baseboard off the wall entirely and install a flat new baseboard to match the plain wainscoting boards.
Set the height of your top rail first. Designs stop at different heights, so measure from the floor and mark your chosen height with a pencil. Make sure the height clears any electrical outlets or light switches. You want the flat boards to run straight down to the baseboard without hitting obstacles.
Lay out the spacing on the wall
Spacing your vertical boards takes a little planning. You want the gaps between the boards to look even across the whole wall. Measure the total width of your wall in inches and count how many vertical boards you want to use. Multiply the number of boards by the width of one board.
Subtract that board total from your overall wall width. Divide the remaining width by the number of empty spaces between the boards. This calculation gives you the exact width for every empty gap. Mark these gaps out to keep your pattern perfectly uniform.
Mark the horizontal spacing along your top baseboard edge. Hold a spirit level vertically against the wall at each mark and draw a light pencil line up to your top rail mark. These lines guide your board placement. Drawing the layout right on the wall shows you exactly how the finished wall will look.
Look at the lines on your wall. Adjust the spacing now before you cut any wood. You might need to move a line to avoid an electrical outlet. Shift the other lines slightly to keep the gaps looking even.
Find studs and plan your fixings
A strong hold requires driving nails into the wooden wall studs, and wires or pipes can run inside walls, so ask a licensed pro if you are unsure what is behind it. Run an electronic stud finder along the wall above the baseboard. Mark every stud location with a pencil. Studs are often evenly spaced, but check each one with the finder.
Place a piece of blue painters tape above each mark to keep the stud location visible after you hold the wood up. Draw a vertical line up from each stud mark to your top rail height. The top horizontal rail crosses every stud on the wall. You will nail the top rail directly into these solid fixing points.
Your planned vertical boards will not always line up with the wall studs. You will secure any unaligned vertical boards by squeezing a wavy bead of construction adhesive on the back. You will also shoot nails into the drywall at a downward angle. The angled nails hold the wood flat against the drywall while the glue dries.
Set up the saw and nailer safely
Put safety glasses and hearing protection on before you plug in any tools. You will use a circular saw for cutting the wood. OSHA says portable circular saws with a blade over 2 inches in diameter must have guards at all times. Check the blade guard on your saw snaps back smoothly before you begin.
Place the wood firmly on a pair of sawhorses. You might want to build simple wooden sawhorses if you lack a good cutting surface. Set the saw blade depth to cut just through the wood. A shallow blade setting gives you a cleaner edge.
Connect your brad nailer to the air compressor. Nail guns require careful handling. NIOSH says nail guns cause about 37,000 emergency room visits each year, about 60 percent of them work related.
The type of trigger on your tool matters. NIOSH says a nail gun with a single shot or full sequential trigger reduces the risk of injury. Set your nailer to single shot mode. Keep your finger completely off the trigger until the metal tip touches the wood.
Cut and fix the top rail and stiles
Measure the wall length for your top horizontal rail. Transfer this measurement to your wood. Use a speed square to mark a straight cutting line. Hold the saw steady to make a straight cut across the board.
Hold the cut rail flat against the wall at your marked height. Check it with a long spirit level to ensure it sits perfectly horizontal. Shoot a brad nail through the rail into every taped stud mark. The solid top rail forms the anchor for your vertical boards.
Measure the distance from the top edge of the baseboard to the bottom edge of the rail. Measure the height for each vertical board individually. Floors often slope slightly in older homes. A board cut for the left side of the room might be too short for the right side.
Cut your first vertical board and apply construction adhesive to the back if it sits between studs. Press the board flat against the wall on your pencil line before shooting nails into the drywall. Angle one nail downward to the left, and the next downward to the right. Space the cross-driven nails evenly along the board, and repeat this process for every vertical piece.
Fill nail holes and caulk the joints
Raw wood and open gaps look messy at this stage. Scoop a small amount of wood filler onto your finger and press it firmly into every nail hole. Leave a slight mound of filler standing over the hole.
Wait for the wood filler to dry completely, as the label directs. Fold a sheet of fine sandpaper into a small square and rub it lightly over the dried patches. Keep the sandpaper flat against the wood to remove the excess filler without scratching the surrounding board. The surface should feel completely smooth to the touch.
Load a tube of paintable acrylic latex caulk into a caulking gun. Avoid pure silicone caulk for this job. Paint often will not stick to silicone, so check that the tube says paintable. Cut the plastic tip of the tube at a slight angle.
Run a thin bead of caulk along every seam where the wood meets the drywall. Dip your finger in a cup of clean water and run it lightly down the caulk line. The water stops the caulk from sticking to your skin. Wipe excess caulk off your finger with a damp rag and let the smooth lines dry as the tube directs.
Prime and paint the finished panels
Bare wood and medium density fiberboard soak up moisture from the air. Apply a coat of water-based primer to the new boards with a synthetic brush. Brush the primer heavily into the corners and edges first. Use a small foam roller to cover the flat faces of the boards.
Primer stops the final topcoat from soaking into the porous material. You must prime bare wood properly before you apply any color. Let the primer dry for as long as the can says.
Choose a durable interior paint in a satin or semi-gloss finish. These finishes tend to wipe clean more easily. Paint the new trim and the exposed drywall between the boards the same color. A single solid color tricks the eye into seeing custom woodwork.
Press a strip of painters tape along the floor where it meets the baseboard, and run a putty knife over the edge to seal it. Brush the paint into the caulked inside corners first, then roll the flat wood surfaces and drywall sections. The roller texture hides the brush marks and leaves a smooth finish. Apply a second coat of paint after the first coat dries, peeling the masking tape away before the second coat hardens.
Line up your next job
-
Hanging peel and stick mirror tiles so they sit flat
Learn how to hang peel and stick mirror tiles on your wall so they sit perfectly flat, align straight and stay put and come down with care.
-
How to regrout tile when the old grout cracks
Learn how to regrout tile by cutting out cracked grout, cleaning the joints and packing in fresh material for a clean finish that lasts.
-
5 laminate floor problems you can fix yourself
You can handle common issues with this straightforward approach to laminate floor repair. Learn how to fix gapping joints, squeaks, and chipped planks.