- Home QZ
- First Projects
- Build a pair of simple sawhorses from 2x4 lumber
Build a pair of simple sawhorses from 2x4 lumber
Searching for diy sawhorse plans is a good way to get a solid work surface, and building a pair from 2x4 lumber takes just a few basic tools.
Guide by Milo Nussbaum
6 min of reading
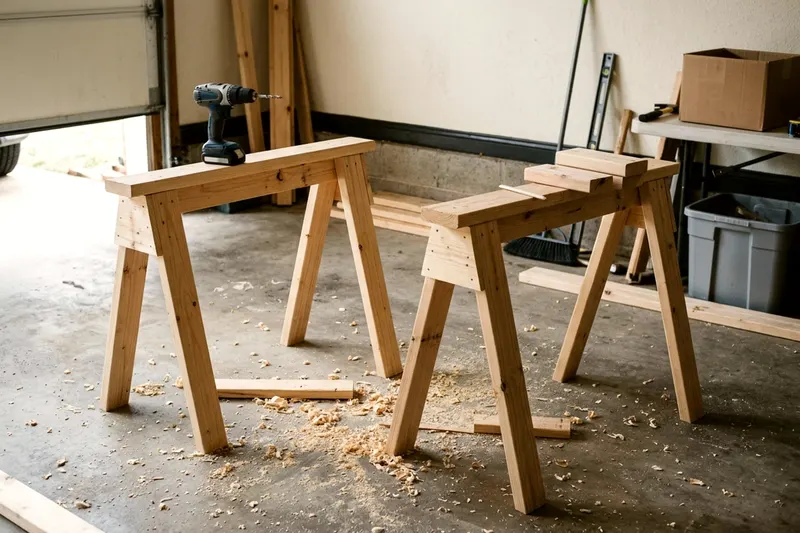
Building two sturdy sawhorses requires only a few pine boards, a drill, a saw and a box of screws. Figuring out how to start woodworking often begins right here with this basic project. You will practice measuring and cutting on a forgiving structure that gives you a reliable work surface for all future jobs.
Gather your lumber, screws and tools
You need several pine 2x4 boards to build a matching pair of sawhorses. Walk down the lumber aisle at the big box store and pick straight boards with no deep cracks. Sight down the edge of each board to check for twists. A straight board makes the final sawhorse sit flat on the floor.
Buy a box of wood screws to hold the pieces together. Deck screws are a common choice, and the box tells you what they suit. Star drive or square drive screws often slip less than standard Phillips head screws.
Pull out your tools before you start. You need a few basic items to build the joints.
- Tape measure and pencil
- Speed square
- Circular saw
- Power drill
- Safety glasses and foam earplugs
Gather the right tools beforehand to save yourself frustrating trips back to the store.
Measure with the real size of a board in mind
A 2x4 board does not actually measure two inches thick by its full nominal width. Under the American Softwood Lumber Standard PS 20 (January 2025 edition), a dry 2 by 4 is surfaced to 1 1/2 by 3 1/2 inches. The same standard defines dry lumber under nominal 5-inch thickness as seasoned or dried to a maximum moisture content of 19 percent.
The 1 1/2-inch actual thickness dictates how you build. You will form a strong T-beam top for each sawhorse. One flat board rests on a vertical spine board. The legs attach flat against the wide 3 1/2-inch face of that vertical spine.
Knowing the true thickness helps you place the screws right in the center of the wood. Measure your joints using the real 1 1/2-inch thickness. If you measure in a full two inches from the edge, your screw will miss the board underneath entirely. A speed square provides a fast guide for this work.
Cut the legs and top rails to length
Put on your safety glasses and foam earplugs before you plug in the saw. Safety gear protects your eyes from flying chips and protects your ears from loud motors. Set up your long boards on a sturdy temporary surface. OSHA advises securing work with clamps or a vise so both hands are free to operate the tool.
Use your tape measure to mark your desired length on your first board. Press your speed square against the board edge and draw a straight pencil line across the wood. You will cut several matching pieces for each sawhorse.
Check your tool before you press the trigger. OSHA says portable circular saws with a blade over 2 inches in diameter must have guards at all times. Ensure the bottom guard swings back freely and snaps closed when released.
Line up your saw blade with the waste side of the pencil line, because cutting right on the line leaves your board short. Push the saw smoothly through the wood. Keep the saw base flat against the board to ensure a straight edge.
Build the first leg pair and check it is square
Stand one board on its narrow edge on the floor to serve as the spine of your sawhorse. Lay two leg boards flat on the ground. Slide the spine board between the top ends of the two legs so their wide faces sit flush against the spine.
Angle the bottom of the legs outward slightly so they form a wide stance at the floor. This angle gives the sawhorse stability to stop it tipping over sideways. Leave the top ends of the legs overlapping the spine block.
Drive two screws through the face of the first leg into the spine. Repeat this for the second leg on the opposite side. Drive the screws straight in to keep the wood from shifting.
Check the joint with your speed square. The top edge of the legs must sit perfectly flush with the top edge of the spine board. A flat, square top ensures the final work surface sits level. If the legs stick up higher than the spine, unscrew them and adjust the fit.
Attach the top rail and the second leg pair
Move to the other end of the spine board to attach the second leg pair. Lay the new leg parts down flat against the spine just as you did before. Angle the bottoms out to match the spread of the first pair.
Drive two screws through each leg into the spine board. Check the top edges to verify they sit flush. You have a standing base with four legs attached to one central spine.
Stand the base up on its feet and lay another board flat across the top. This top rail covers the top edge of the spine and the top ends of all four legs. The flat surface forms a broad area for clamping your projects.
Drive screws down through the top rail into the spine board. Space the screws evenly apart along the center line. Drive one screw down through the rail into the top end of each leg. The top rail locks the legs down and prevents them twisting under a heavy load.
Add braces so the legs do not rack
Your sawhorse can stand up, but the legs will splay outward under a heavy load. You need horizontal braces across each pair of legs to stop the wood from racking. Racking happens when weight pushes the structure out of square and loosens the joints.
Measure the distance across the outside of the legs a short distance up from the floor. Write down that exact distance, because it gives you the length of each brace.
Cut the brace pieces from scrap 2x4 to that measurement. Hold one brace flat against the outside edges of the first leg pair. Drive two screws through the brace into each leg. Use your body weight to press the drill firmly so the screws bite deep into the wood.
Go to the other end of the sawhorse and install the second brace at the exact same height. The braces stop the legs from spreading and keep the sawhorse from swaying side to side. Repeat this entire measuring and cutting process to build the second sawhorse.
Use your sawhorses safely on the next job
Move your finished sawhorses out to your driveway or garage and space them well apart. This distance supports long boards without letting them sag in the middle.
Home built sawhorses have no load rating, so keep loads modest and place heavy material gently across the top rails, because dropping a stack of lumber can stress the screw joints. Check the ground beneath the legs before you start working. Adjust the leg positions if the sawhorses rock on an uneven concrete floor.
You can drive screws directly into the top rails to hold your work steady. Wood screws will chew up the top rail over time, leaving holes and splinters.
Unscrew the damaged top board and replace it with a fresh cut when it gets too rough. Maintaining the top rail keeps your sawhorses useful.
Line up your next job
-
DIY projects for beginners ranked from easiest to hardest
Try diy projects for beginners ranked from easiest to hardest, with the tools each needs, how long it takes and which jobs to leave to a licensed pro.
-
DIY wainscoting a beginner can put up in a weekend
Building DIY wainscoting adds character to a plain room in a single weekend when you follow these simple steps to measure, cut and paint.
-
Hanging peel and stick mirror tiles so they sit flat
Learn how to hang peel and stick mirror tiles on your wall so they sit perfectly flat, align straight and stay put and come down with care.