- Home QZ
- Laying Floors
- Laying vinyl plank flooring over an old floor
Laying vinyl plank flooring over an old floor
Learn the steps for a successful vinyl plank flooring installation over your existing floor including how to prep the surface and lock the boards in place.
Guide by Nora Mattingly
8 min of reading
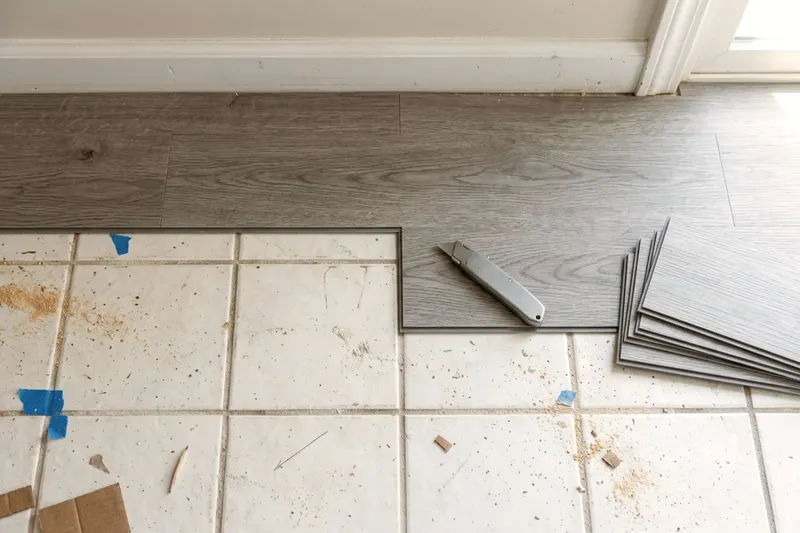
You can lay rigid core vinyl planks directly over many existing floors without tearing up the room. A floating floor clicks together and rests on top of the old surface. This skips the demolition mess of pulling up the old floor.
Identify your old floor and check if it can stay
Rigid core vinyl plank works well over hard, flat surfaces like concrete or plywood. Only some old floors can stay, so check the approved list first. Lifeproof lists existing ceramic tile and non-cushion sheet vinyl among approved subfloors. This saves you days of scraping and hauling trash.
Lifeproof does not approve carpet, carpet pad, cushioned vinyl or floating floors such as laminate as subfloors, so remove them and any old adhesive. Soft layers can compress under your feet and strain the locking joints. Tear out any old floor that feels soft or spongy, but never sand, dry sweep or dry scrape old resilient flooring. Before tearing up old sheet goods, presume they contain asbestos unless you are certain they do not, and find out if your old floor tiles contain asbestos.
Look at where heavy fixtures sit before you plan the floor. Cabinets should be installed first. The floating floor must not be glued, nailed or fastened to the subfloor.
The flooring stops short of fixed cabinet bases, with the expansion gap left around them. You will trap the planks if you build heavy cabinets on top of them. Trapped planks can buckle.
Measure your room with a tape measure to calculate the square footage. Multiply the length of the room by the width, adding the spaces inside closets. Lifeproof suggests ordering about 10 percent more flooring than the square footage to cover cuts and waste.
Store the boxes flat in the room where they will live. Lifeproof says its planks generally need no acclimation when stored properly, but check your own product's instructions.
Make the old floor flat enough for vinyl planks
Flatness matters more than being perfectly level. A floor can slope slightly from one side of the room to the other, but it cannot have dips, bumps, or ridges.
Lay a straight ten-foot piece of lumber or a long level across the room. Get down on the floor and look for daylight under the straightedge. Slide a tape measure into any gaps you see.
The subfloor must be level within 1/4-inch in a 10-foot span. Mark any low spots with a pencil. Circle any high spots.
If you lay planks over old ceramic tile, check the grout lines. Lifeproof notes there is no need to fill tile grout lines if flatness is met. Deep or wide grout lines that cause the straightedge to dip must be filled. Scrape a cement patching compound flat with a wide putty knife and let it dry hard.
Wood subfloors often have high spots at the plywood seams. Sand these down with heavy grit sandpaper and drive in any loose nails or screws that stick up. If you find low spots in a concrete floor, fill them with a patching compound made for floor installation, following its label.
Sweep the entire floor with a stiff broom. Vacuum up the remaining dust. Small pebbles left on the subfloor will click under your feet later. They can eventually wear a hole through the bottom of the vinyl plank.
Plan your layout and leave room for expansion
Vinyl planks expand and contract slightly as your home heats and cools. The entire floor moves as a single sheet, so the edges need space to move. Lifeproof calls for a 1/4-inch expansion gap around perimeter walls and heavy fixed objects such as cabinets and tubs.
Buy a kit of vinyl plank flooring installation tools from a big box store. Push the plastic wedge spacers from the kit against the drywall or the existing baseboard. You will press your first row of planks tight against these spacers. Place several spacers evenly along the wall to keep the gap straight.
Measure the width of your room before you place the first plank. Divide that measurement by the width of one plank to see how many rows you need.
Check the remaining space for the last row. You do not want a final row that is extremely narrow, because a thin strip at the wall rarely locks tight. If your math shows a tiny final row, trim some width off your very first row to balance the room.
Take planks from three different boxes as you work. The printed wood grain patterns vary. Mixing the boxes prevents matching planks from sitting right next to each other. This makes the finished floor look like real wood.
Cut planks with a utility knife and straightedge
Put on safety glasses and heavy work gloves before making your first cut. You do not need a loud power saw for most of this job. Rigid core planks cut easily with basic hand tools. This keeps the sawdust out of your house and makes the job quiet.
Measure the distance for your cut and mark the face of the plank with a pencil. Lay a metal straightedge across the mark. Hold it firm.
Score the surface heavily with a sharp utility knife. Pull the blade toward you. You just need to break the tough clear wear layer on top.
Pick up the plank with both hands and snap it backward along the scored line. The rigid core breaks cleanly in a straight line. The attached underlayment on the back will still hold the two pieces together. Slice this foam backing with your knife to separate the cut.
You will need to rip planks lengthwise for your final row using the same score and snap method. Mark the line down the whole plank and score it several times. Place the plank on the edge of a table. Snap the waste piece downward.
Some cuts require a saw. Use a jigsaw to cut U-shapes for floor vents or curves for pipes. Drill a hole in the waste area first. Drop your jigsaw blade into the hole and cut outward to the line.
Click rows together and stagger the joints
Start in a front corner of the room and work from left to right. Place the first plank flat on the floor with the groove side facing the open room. The tongue side faces the wall. Push it against your plastic spacers.
Take your second plank. Angle its short end tongue into the short end groove of the first plank.
Drop it flat to the floor so the joint locks tight. Continue this until you reach the opposite wall. Measure and cut the last plank in the row.
Start your second row with the leftover cut piece from the first row to stagger the joints across the floor. Keep end joints well apart from the joints in the next row, at least as far as your instructions say. Staggered joints make the floor stronger. They stop the floor from separating when people walk on it.
Angle the long side of the new plank into the long groove of the previous row. Push it in tight while holding it at a low angle and drop it flat. The plank will rest almost perfectly in place.
Take your tapping block from your tool kit and place it against the edge of the plank. Tap the block gently with a rubber mallet to close any hairline gaps. Never hit the plank directly with a hammer, as you will crush the locking edge.
Move down the row to finish seating the plank. Tap the long edge first. Then tap the short edge tight.
Manage doorways and tight spaces
You want the planks to slide beneath the wood door frames, not wrap around them. Cutting around a door frame leaves ugly gaps that you cannot hide.
Lay a scrap piece of flooring flat against the door casing. Rest a flush-cut handsaw flat on the scrap piece and saw completely through the bottom of the wood casing, but never undercut a metal one.
Pull the cut piece out with pliers. You now have a gap at the floor exactly the thickness of your vinyl plank. Slide your new plank right under the door frame.
When you reach the final wall, a tapping block will not fit in the tight space. Use a metal pull bar on the long joints instead, never on the short edges. Hook one end of the pull bar over the edge of the final plank and tap the other end with your mallet. This pulls the plank tight against the previous row.
Finish at tubs and toilets with the right seal
Bathrooms demand extra moisture protection, since water from wet feet or a dripping tub can damage subfloors. Leave a 1/4-inch expansion gap against the side of the bathtub. Do not put baseboard or shoe molding against the tub.
Fill this gap completely with silicone caulk. The silicone flexes as the floor moves. It helps keep water out of the gap. Smooth the caulk with a wet finger for a clean edge.
Pull the toilet before you begin laying the planks. Shut off the water supply and flush the tank empty. Unbolt the toilet and lift it off the floor. Scrape away the old wax ring.
Cut the flooring to leave an expansion gap around the closet flange instead of running the planks right up to it.
Measure the location of the flange and transfer the circle to your plank. Cut the hole with your jigsaw. Lock the plank into place.
Reinstall the toilet directly on top of the new vinyl floor. The new floor sits higher than the old one. Check the wax ring maker's instructions for the new floor height. Do not anchor the toilet through the planks, and seal around the flange with waterproof silicone caulk.
Add baseboards and transition strips
Once the floor is fully laid, remove all the plastic spacers from the perimeter. The gap must stay empty. Do not fill the wall gaps with caulk or spray foam. The floor needs room to breathe.
Cover the gap with new baseboards. Nail the baseboards to the drywall, but never nail them down into the flooring. If your old baseboards are still on the wall, cover the expansion gap with shoe molding. Nail the shoe molding directly into the baseboard.
Finish your doorways with transition strips wherever the vinyl meets a different type of flooring. Follow the molding instructions to fasten the track, and never fasten through the planks. Snap the top molding piece into the track. The track grips the strip and hides the rough edges of both floors.
Sweep your new floor and mop it lightly with a damp pad. Move your furniture back into the room, lifting heavy items instead of dragging them. Put felt pads under your chair legs to protect the tough wear layer from scratches.
Line up your next job
-
Could your old floor tiles contain asbestos
Asbestos tiles can hide under old carpet in older homes. Learn where they turn up, why an accredited pro should take samples and what your options are.
-
9 tips for peel and stick floor tile that stays down
A proper prep routine and heavy rolling keep your peel and stick floor tile flat and help stop the corners from lifting after you finish the room.
-
Does laminate flooring need underlayment
Find out when you need a separate laminate flooring underlayment to protect your planks and when a concrete subfloor demands a plastic vapor barrier.